SpeechGen API Integration with Make.com: Automate Text-to-Speech Workflows
09-09-2025 , 12-09-2025
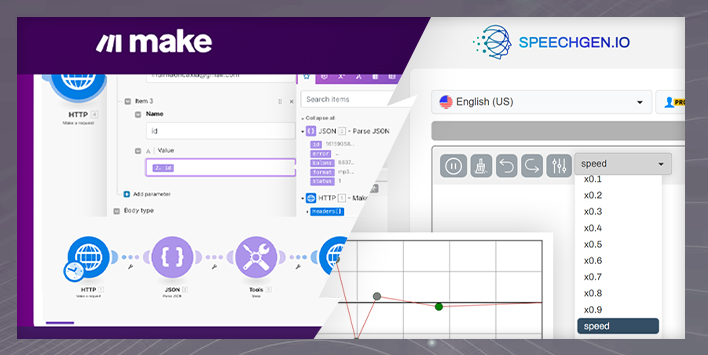
Simplify Voice Content Creation: Integrating SpeechGen.io with Make.com. This blog post guides you through integrating the automation service Make.com (formerly Integromat) with our neural network-based speech synthesis service, SpeechGen.io. This integration allows for the automation of text-to-speech processes, making content creation easier and more efficient.
How It Works
We cover two methods based on the length of the text you want to convert to speech:
-
For texts up to 2000 characters: This method involves a quick request and immediate receipt of the speech output. It's perfect for short texts that need to be converted quickly.
-
For texts over 2000 characters: This method uses two requests. The first request sends the text with voice settings for conversion. The second request, which should be made no sooner than one minute later, retrieves the finished audio file. This approach ensures that longer texts are processed efficiently without overloading the system.
Why Use Make.com?
Make.com facilitates the automation of these processes without the need for deep technical knowledge. You can set up triggers to automatically start the text-to-speech process when certain conditions are met, such as the addition of new text to your CMS or database.
Getting Started
To begin with the integration, you'll need to familiarize yourself with our API. You can find all the necessary information, including documentation and FAQs, at SpeechGen.io API FAQ.
Full Video Guide
1. Short Text method
In this blogpost we’ll learn how to generate an Mp3 file from text using SpeechGen, then upload that Mp3 File to DropBox.
You can download and import the demo project json f shown in this blog and use it.
1. Requirements
2. Get your SpeechGen API Key
- Login to your SpeechGen.io profile
- Navigate to your profile
- Reveal and Copy your API Key. We’ll use it later.

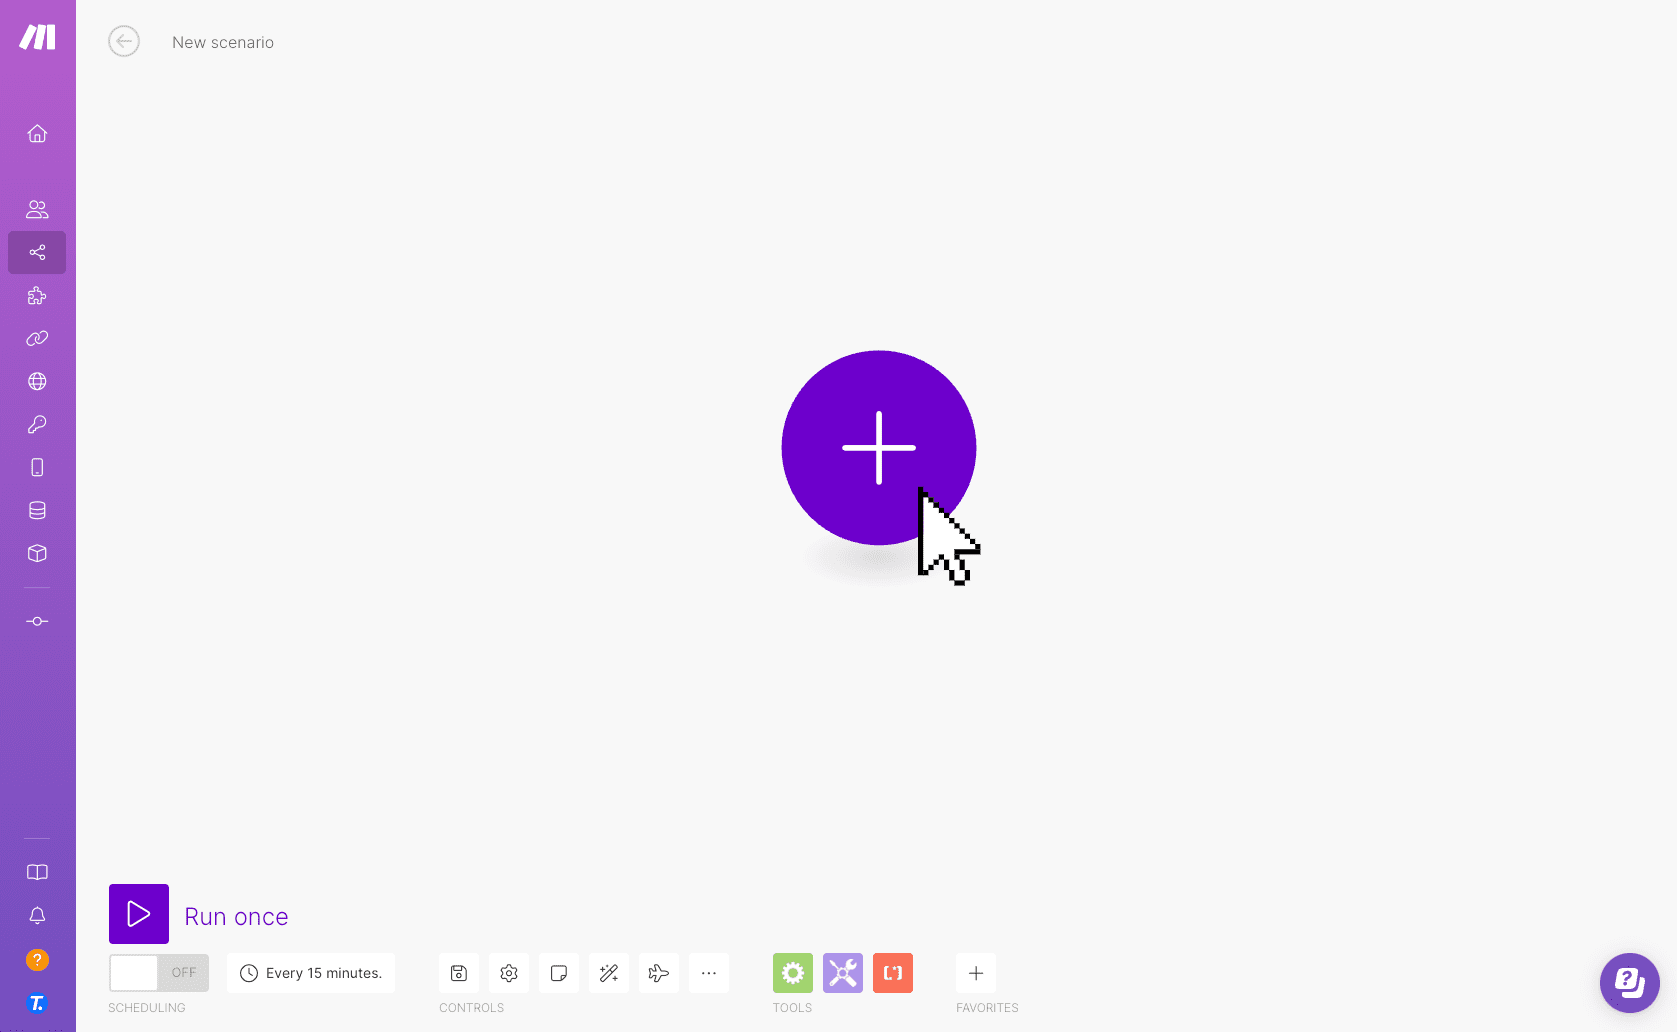
3. Create a new scenario
Login to Make.com & Click "Create a new scenario".

4. Add a new Module
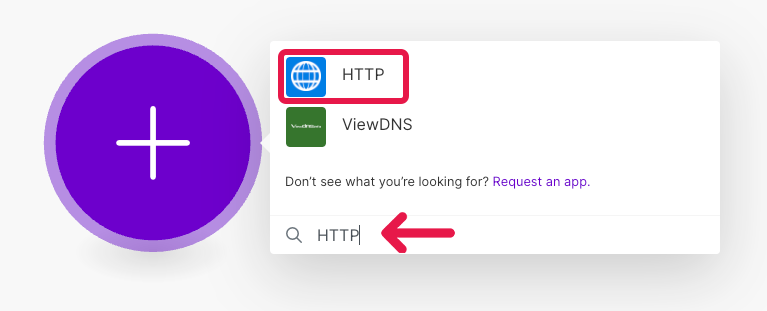
5. Select HTTP
Search for "HTTP" and select "HTTP" from the list of available modules.
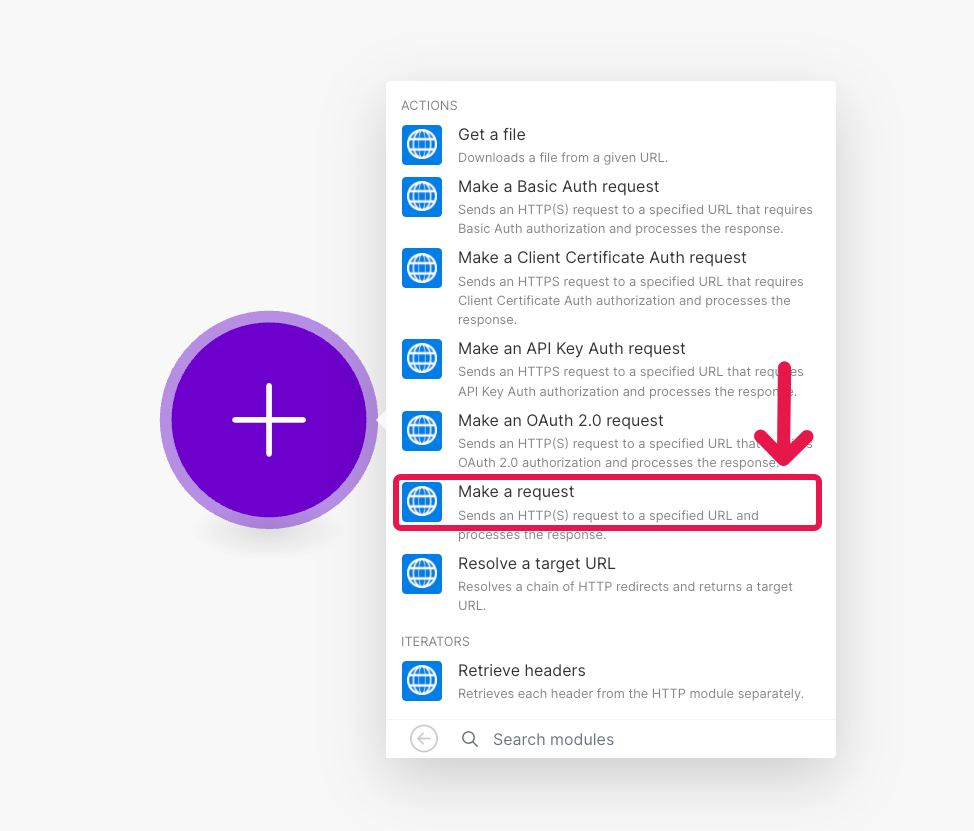
6. Select Make a request
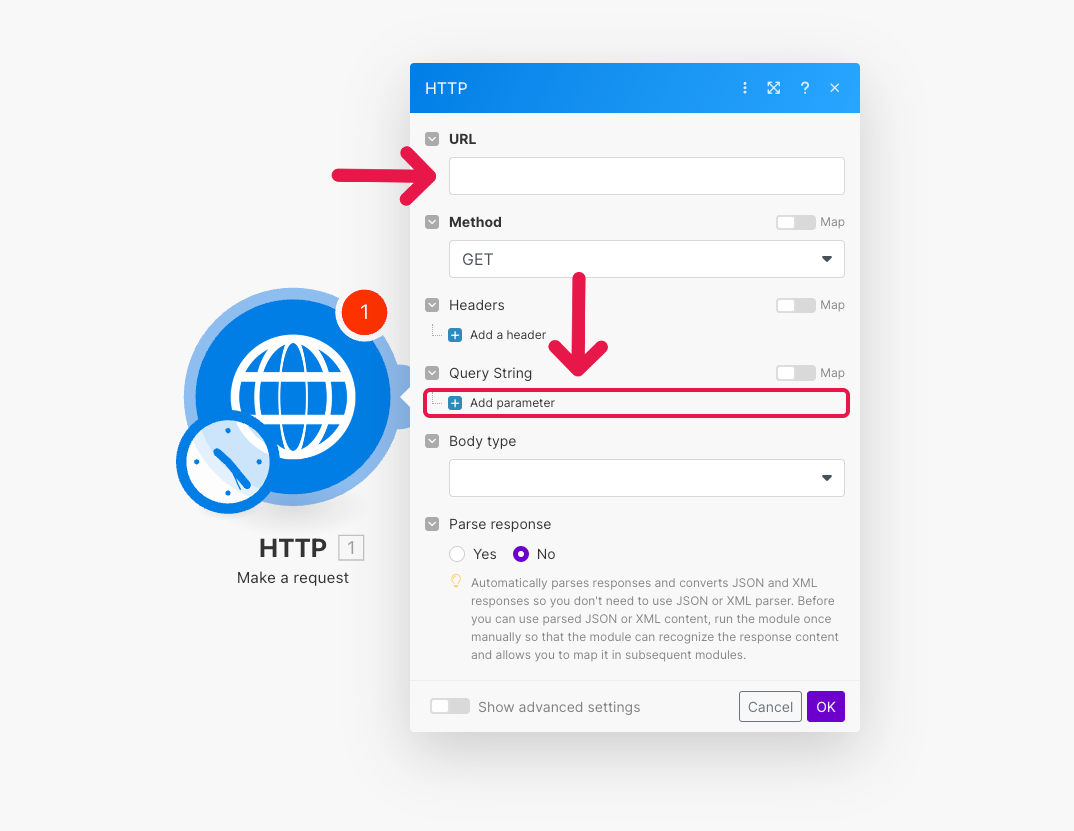
7. Input URL
Input URL as https://speechgen.io/index.php?r=api/text
Then Click “Add parameter” to add Query params to our request
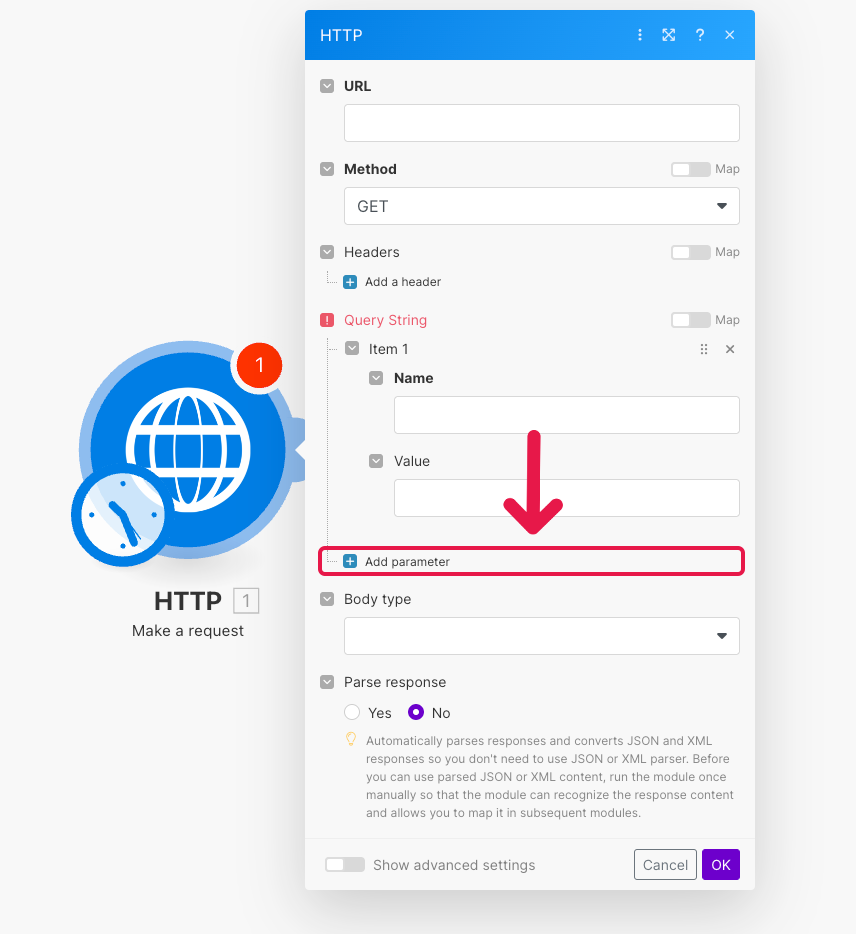
8. Insert 3 more parameters
We need to input 4 parameters in total, so let’s add 3 more.
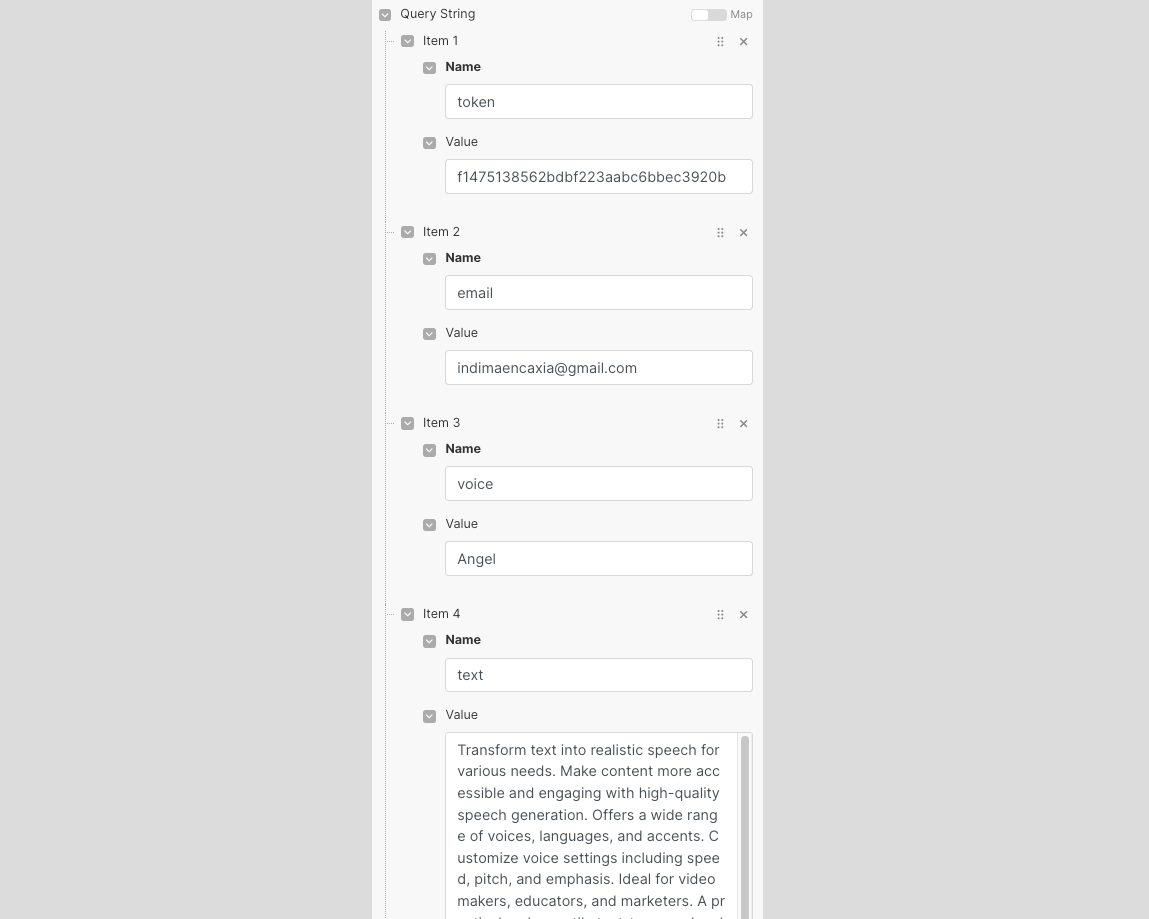
9. Input the required parameters
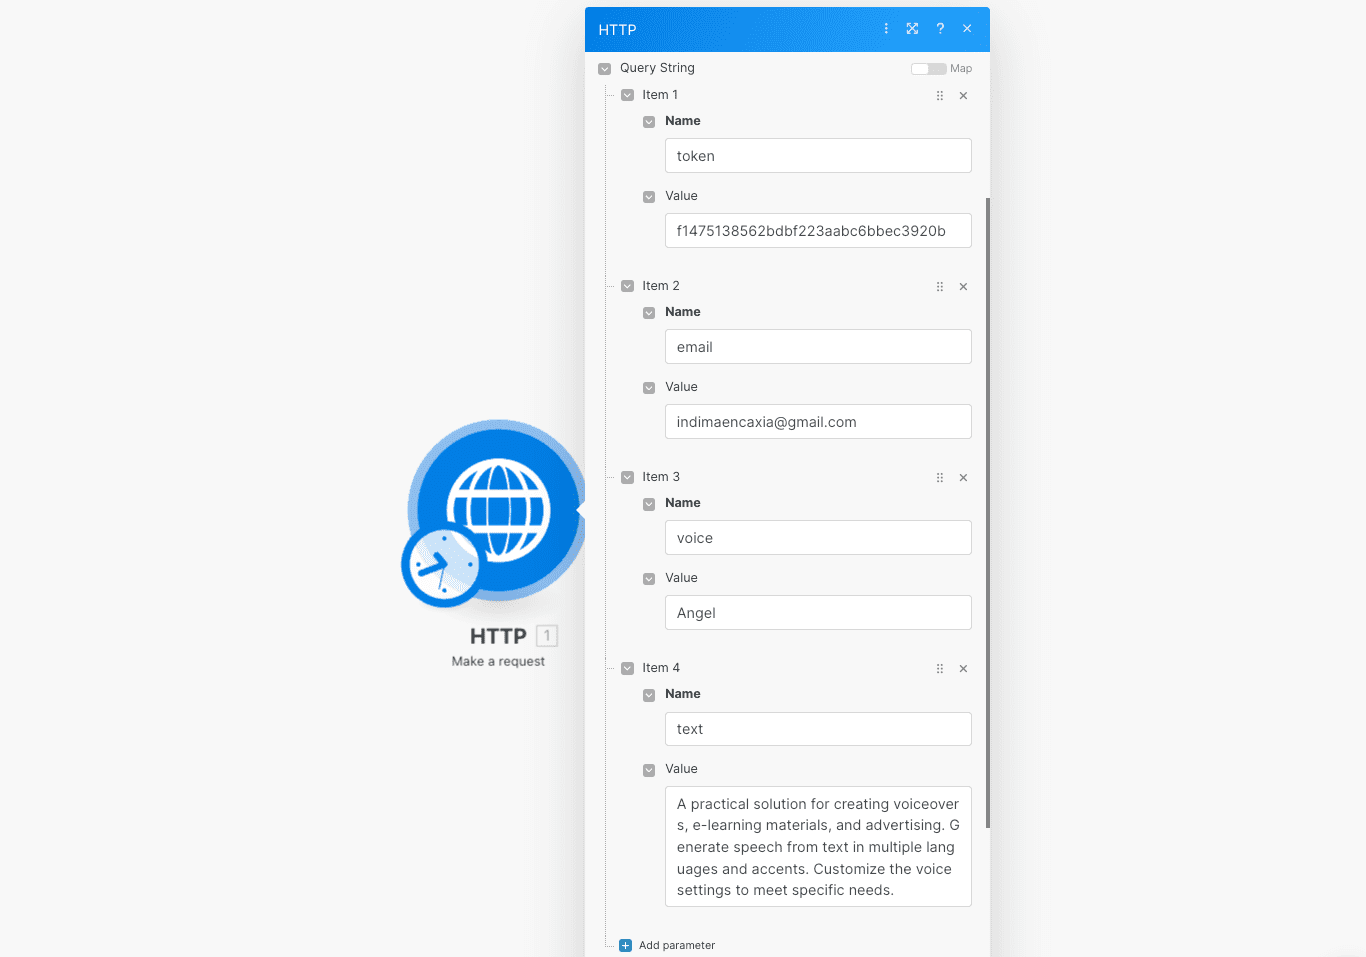
- token = The API Token you copied from Step 2
- email = The email associated with your SpeechGen account
- voice = The exact name of the voice, you can choose the voice you like from the Full voices list and copy the name of the voice from there. JSON API voices https://speechgen.io/index.php?r=api/voices.
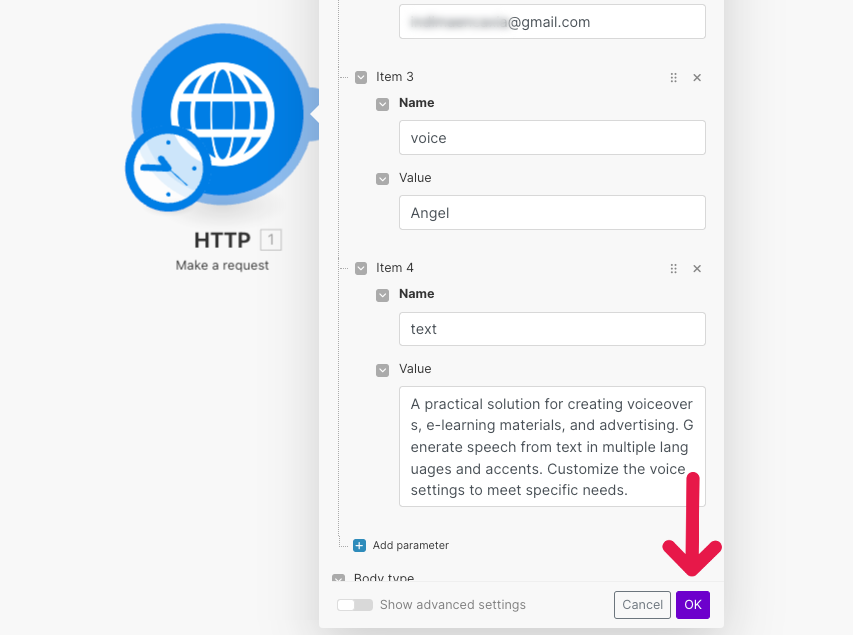
- text = The text you want to turn into speech. For an example, I will paste such text: "A practical solution for creating voiceovers, e-learning materials, and advertising. Generate speech from text in multiple languages and accents. Customize the voice settings to meet specific needs".
10. Click on OK to save the changes
11. Run your scenario
Now it’s time to run and test your scenario.
12. Click on the bubble
Click on this bubble to see the result of your request.

Focus on the output part, You’ll see ‘Data’.
You can see ‘file’ which’s the URL of the generated Mp3 file of our text
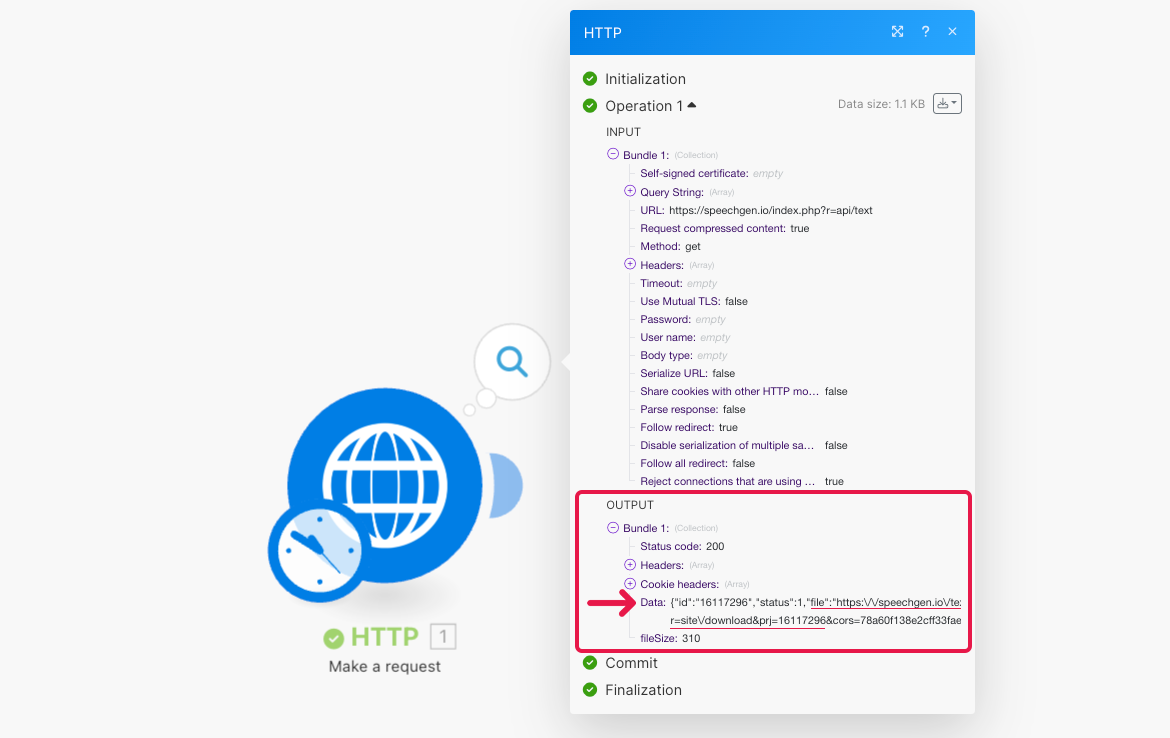
If you navigate to this URL, you can play and download the Mp3 file.
To make the data from SpeechGen easily accessible by other modules, we can add another Module to our Scenario.
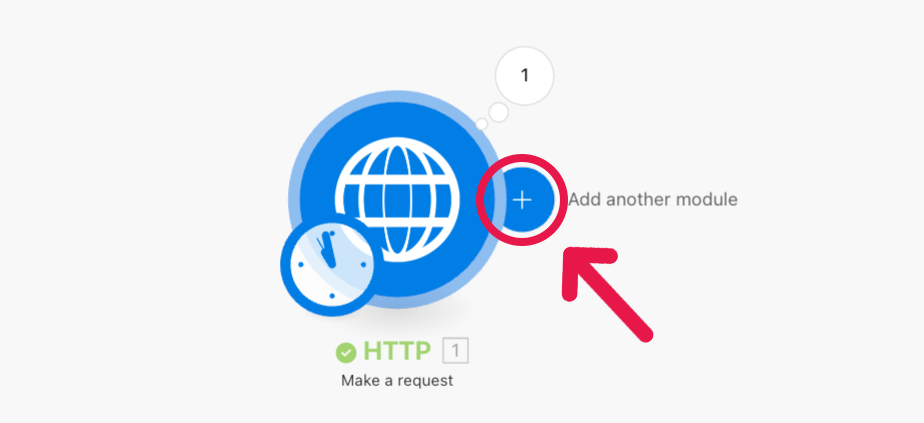
14. Add another module
Hover your mouse next to the first module we have, you’ll see a plus button, click on it
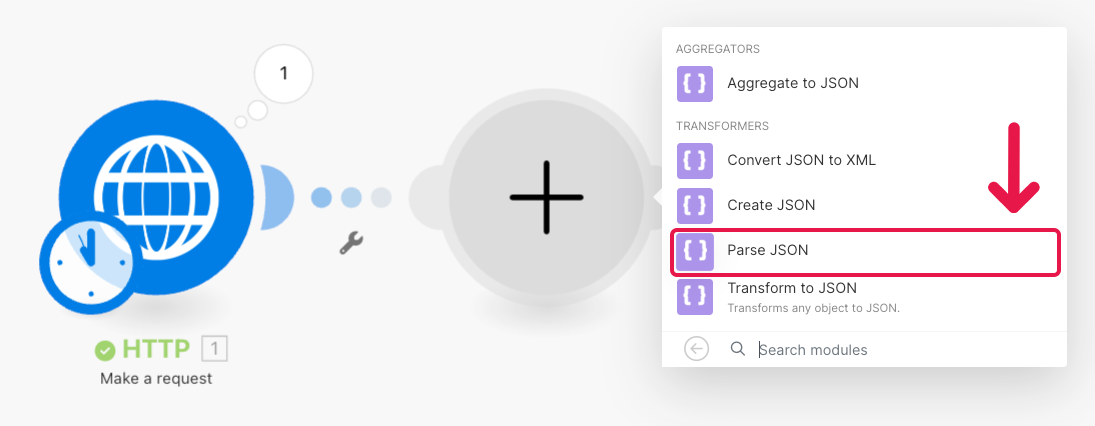
15. Select the 'JSON' option
Search for 'JSON' and select this option.

16. Choose Parse JSON
Then Select "Parse JSON" so we could export the data from SpeechGen into multiple variables we can use in our scenario.
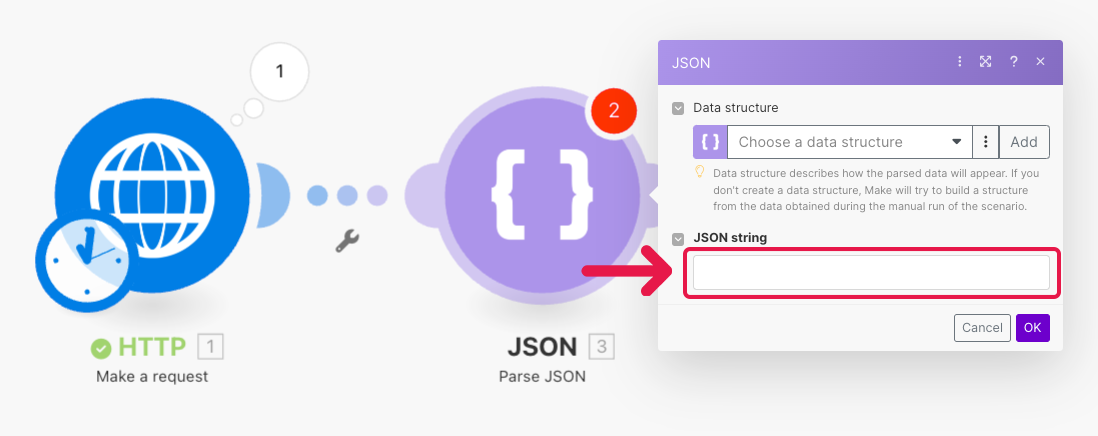
17. Input ‘Data’
Click here (JSON string) to input ‘Data’ from the previous HTTP module
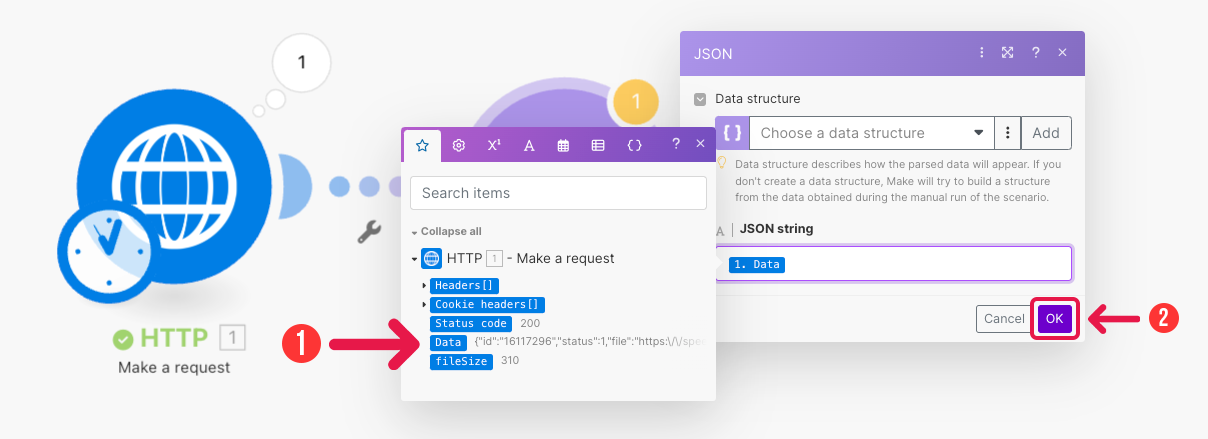
18. Click ‘Data’
Click ‘Data’ to add it to the field and click OK to save changes.
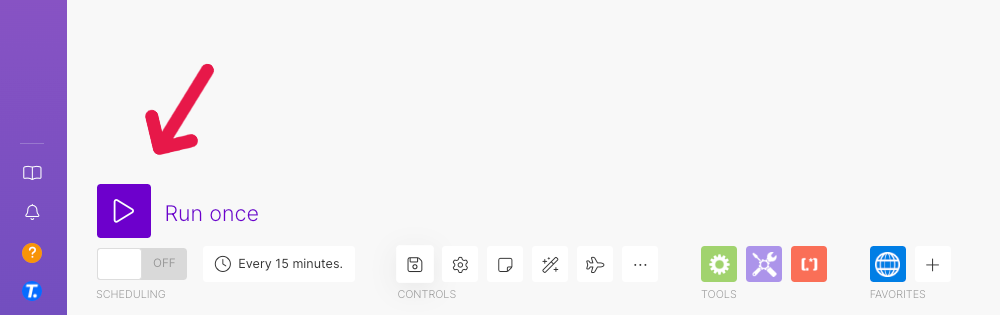
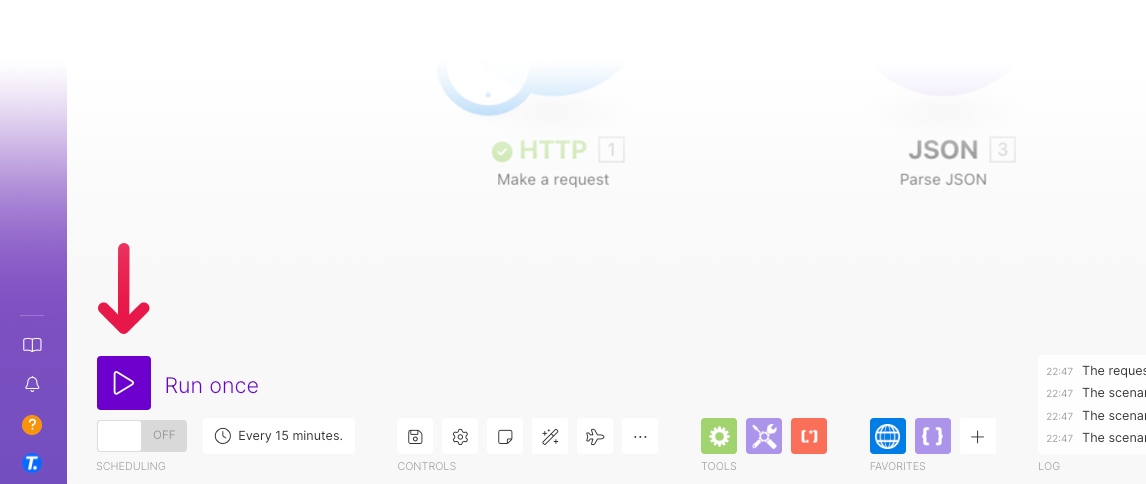
19. Run Once
Click ‘Run Once’ to execute the Scenario.
Select ‘Run Anyway’ to force Make to run the Scenario.
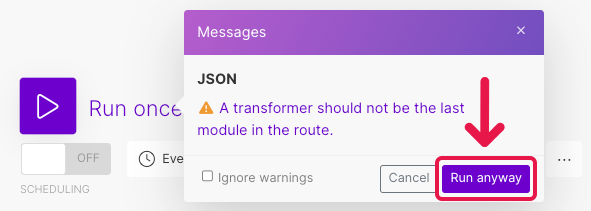
This is because JSON shouldn’t be the last module in the scenario, since it transforms the data from another module and we’re not doing anything with that data, in this case we just want to see the data first, then decide what to do with it.
20. Click the bubble
Click the bubble above the JSON module to see the data we got.
Now the data that was all under ‘Data’ is now in individual variables that we can use in the next modules…
You can also notice the ‘file’ variable that had the URL of the Generated Mp3 File which we’ll use in the next module.
Now let’s upload the generated Mp3 file to Dropbox, to do that we need to download the Mp3 file in this scenario first.
21. Add another HTTP Module to download the file
Select Get File so we could download the Mp3 File inside the Scenario.
Most modules only require the URL, but DropBox requires Direct input of actual file data.
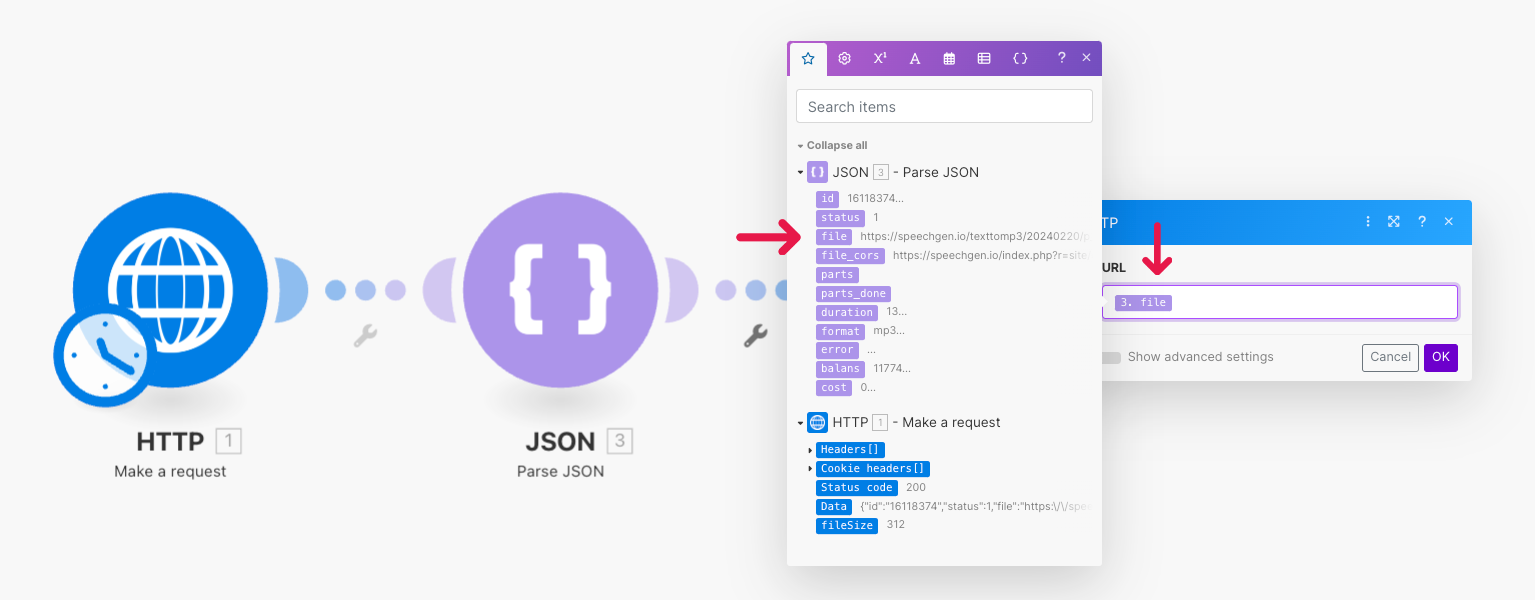
22. Map the ‘file’ variable
Map the ‘file’ variable, which’s the URL we can use to get the file.
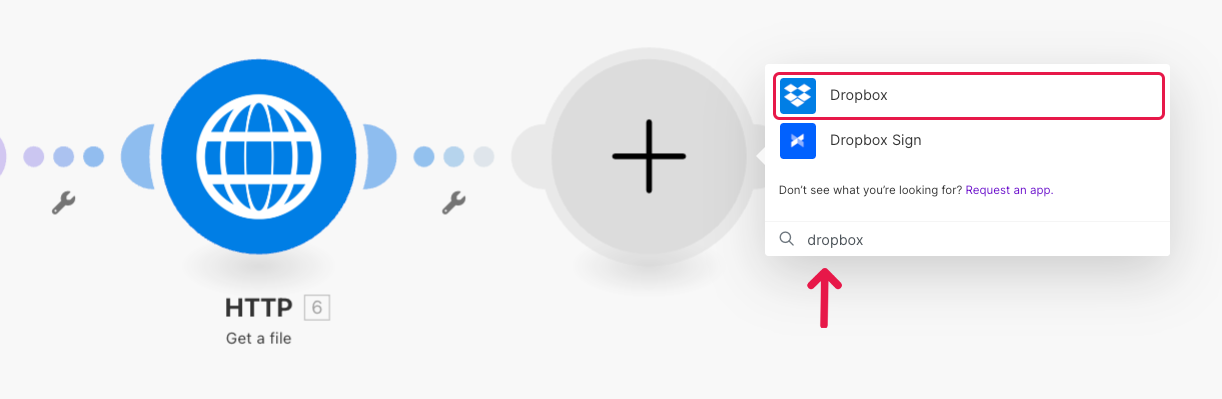
23. DropBox module
Then we’ll add the DropBox module.
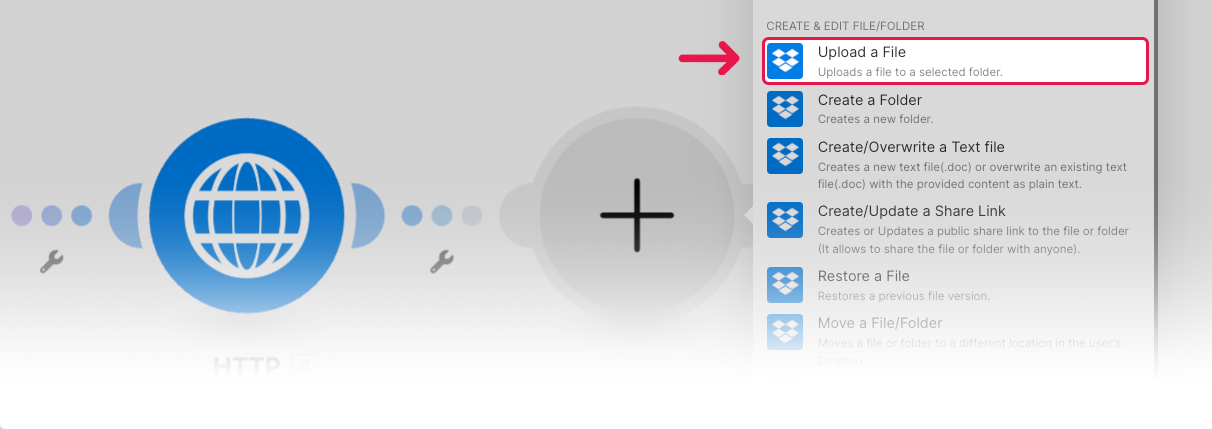
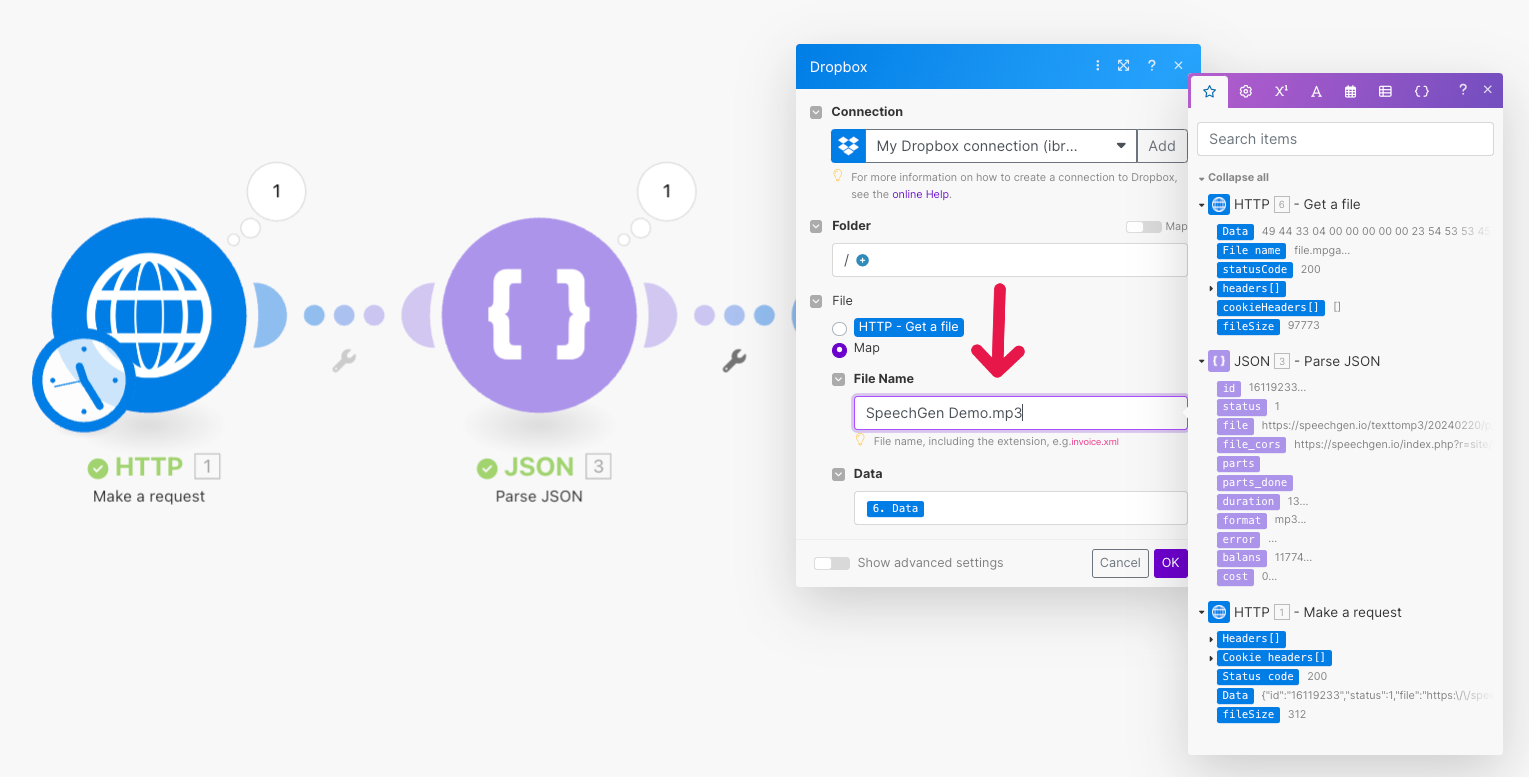
24. Select Upload file
Choose the folder to save to inside your Dropbox, then Choose Map so we could change the name of the uploaded Mp3 File.
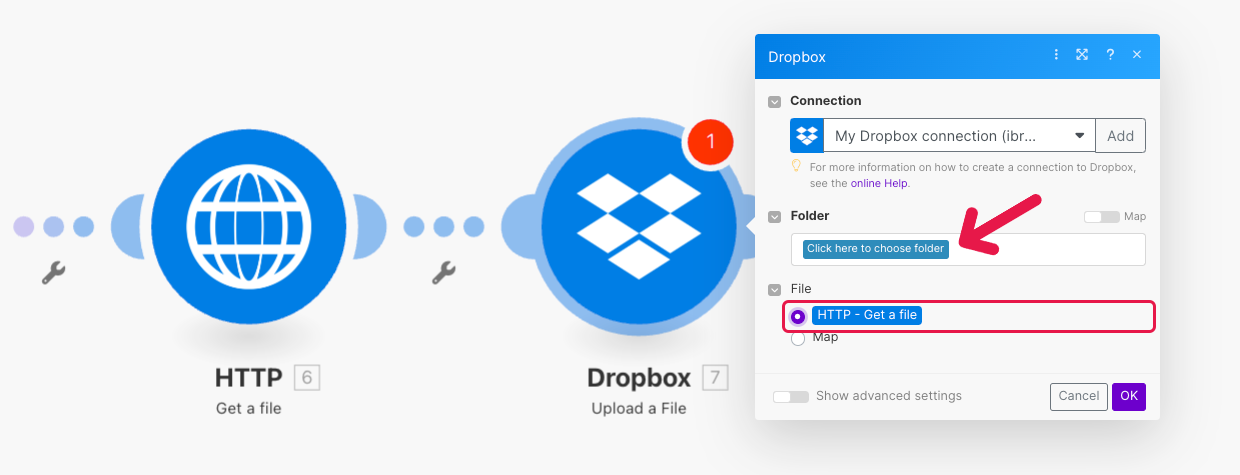
Make sure you add the ‘.mp3’ file extension at the end of the name, so it’d easier for Dropbox to recognize it as an Mp3 file you can play.
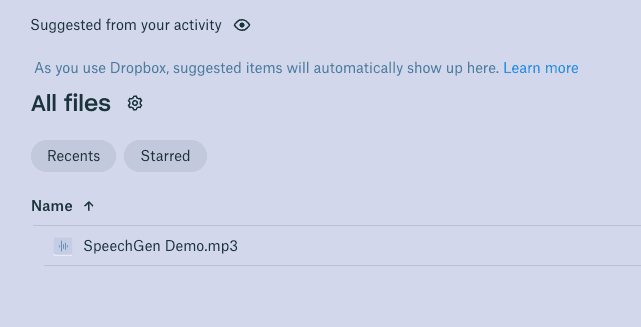
After running the Scenario, we have the File uploaded to DropBox
Complete process for a 1-st method
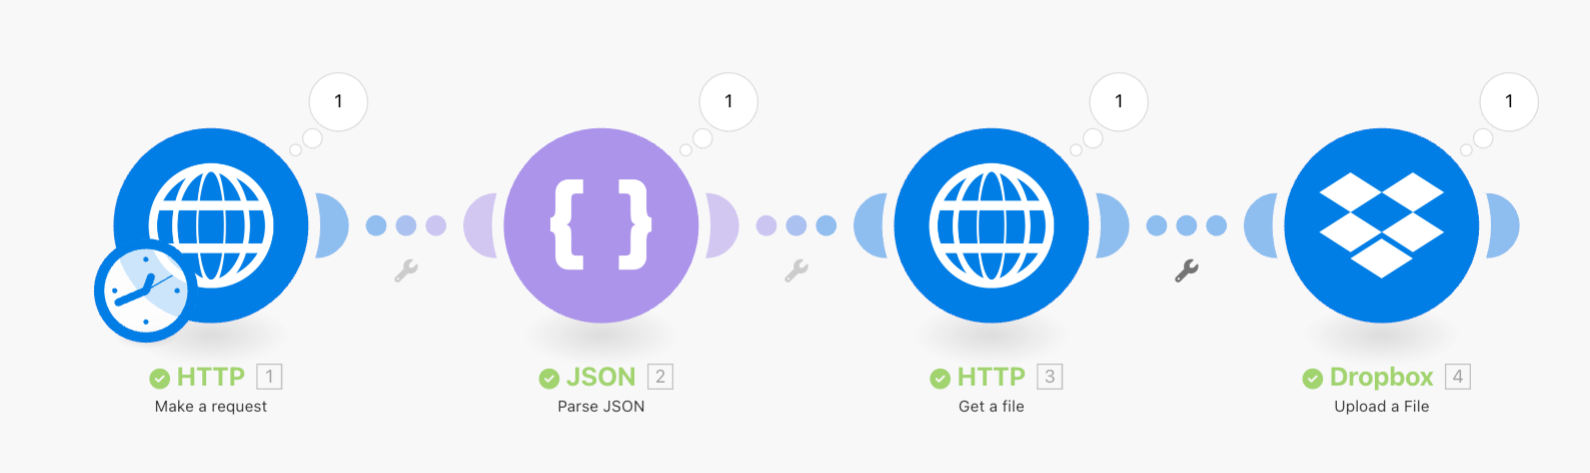
- HTTP: Generate the Audio from text using SpeechGen.io
- JSON: Parse the data we get from the SpeechGen API
- HTTP: Get binary data of the generated file
- Dropbox: Upload that data to Dropbox
2. Long Text method
Now, we’re utilizing SpeechGen’s Long text API to generate a Long TTS.
The second method is designed for texts longer than 2000 characters. Unlike the first method, which quickly converts short texts into speech, this approach involves two steps due to the processing time required for longer texts.
- Initial Request: You send the text with chosen voice settings to start the conversion process.
- Follow-up Request: After waiting for at least one minute, you make another request to retrieve the finished audio file. This delay ensures the system has enough time to process the longer text without any issues.
The main difference from the first method is the need for a second request due to the longer processing time. This method ensures efficient handling of extensive texts, making it suitable for creating longer audio content.
Then we’ll upload the file to Dropbox as a demo, but the options are endless on how you can use this TTS API.
You can download and import the demo blueprint for Long Texts json shown in this blog and use it.
1. Requirements
2. Get your SpeechGen API Key
- Login to your SpeechGen.io profile
- Navigate to your profile
- Reveal and Copy your API Key. We’ll use it later.
3. Create a new scenario
Login to Make.com & Click "Create a new scenario".

4. Add a new Module
5. Select HTTP
Search for "HTTP" and select "HTTP" from the list of available modules.
6. Select Make a request
7. Input URL
Input URL as https://speechgen.io/index.php?r=api/longtext
Then Click “Add parameter” to add Query params to our request
8. Input 4 parameters
We need to input 4 parameters in total, so let’s add 3 more
9. Input the required parameters
- token = The API Token you copied from Step 2
- email = The email associated with your SpeechGen account from Step 2
- voice = The exact name of the voice, you can choose the voice you like from the Full voices list and copy the name of the voice from there. JSON API voices https://speechgen.io/index.php?r=api/voices.
- text = The text you want to turn into speech.
10. Click on OK to save the changes
11. Run
Now it’s time to run and test your scenario
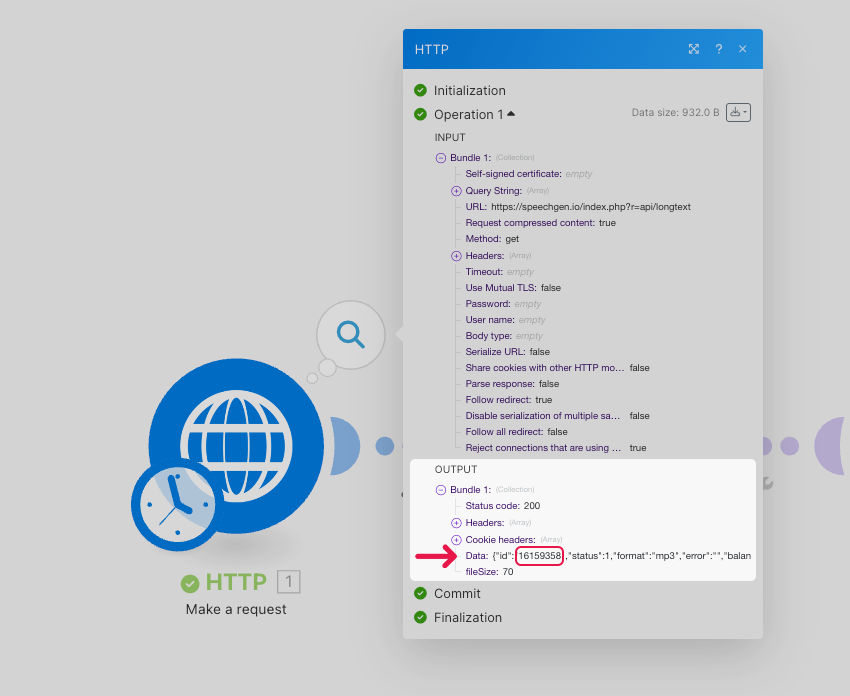
12. Click on the bubble
Click on this bubble to see the result of your request
Focus on the output part, You’ll see ‘Data’.
You can see ‘id’ which’s the ID of our request.
Now, To make the data from SpeechGen easily accessible by other modules, we can add another Module to our Scenario
13. Add another module
Hover your mouse next to the first module we have, you’ll see a plus button, click on it
14. Add JSON
The search for ‘JSON’ and select this option
Then Select Parse JSON so we could export the data from SpeechGen into multiple variables we can use in our scenario
15. Input ‘Data’
Click here to input ‘Data’ from the previous HTTP module.
16. Click ‘Data’
Click ‘Data’ to add it to the field and click OK to save changes.
17. Run Once
Click Run Once to execute the Scenario.
Select ‘Run Anyway’ to force Make to run the Scenario
This is because JSON shouldn’t be the last module in the scenario, since it transforms the data from another module and we’re not doing anything with that data, in this case we just want to see the data first, then decide what to do with it.
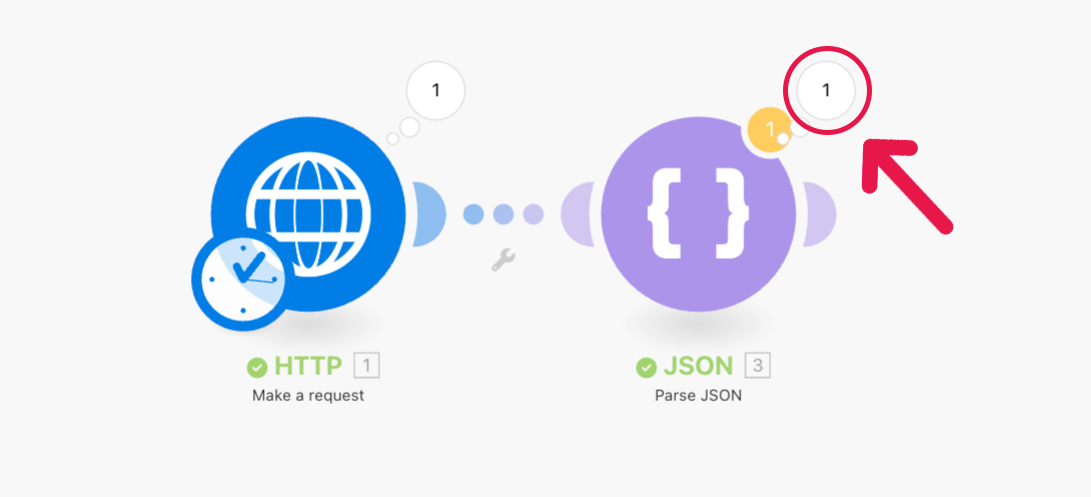
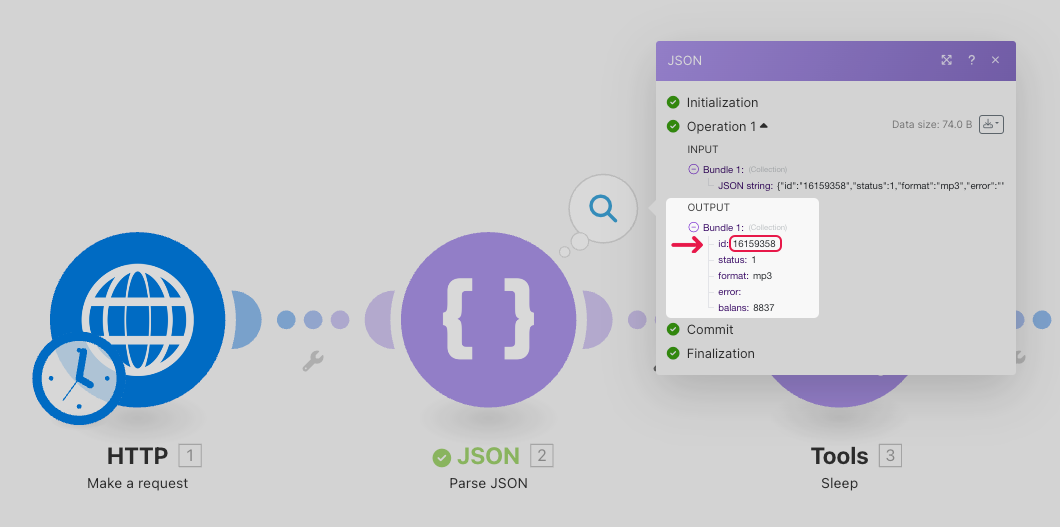
18. Click the bubble
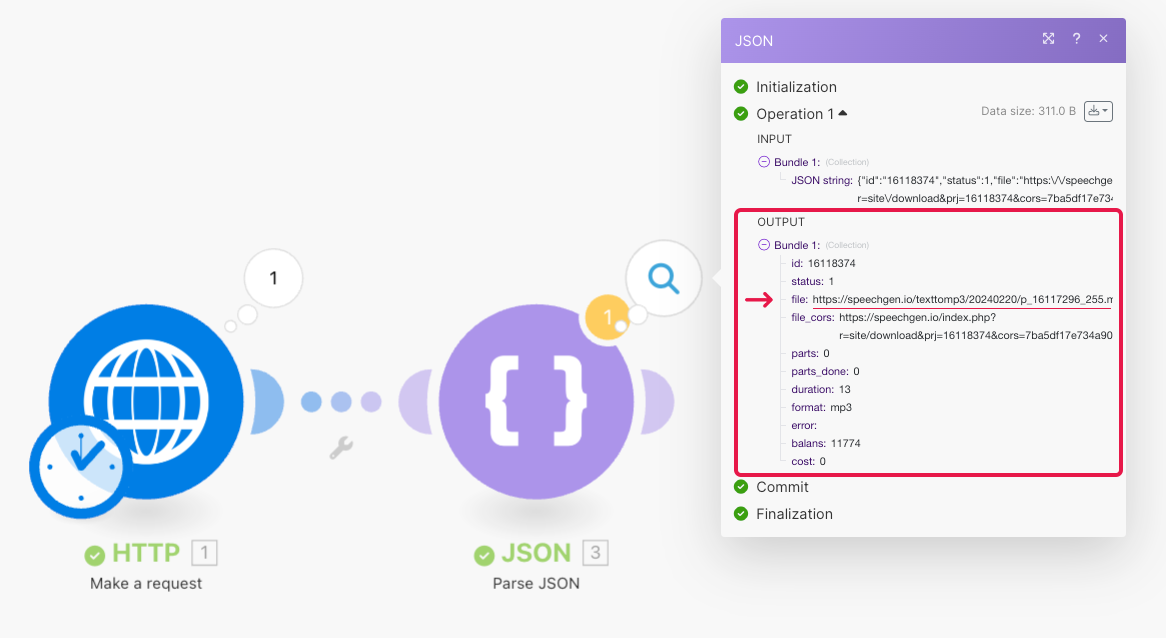
Click the bubble above the JSON module to see the data we got.
Now the data that was all under ‘Data’ is now in individual variables that we can use in the next modules.
You can also notice the ‘ID’ variable which we’ll use in the next steps to Get our TTS File URL.
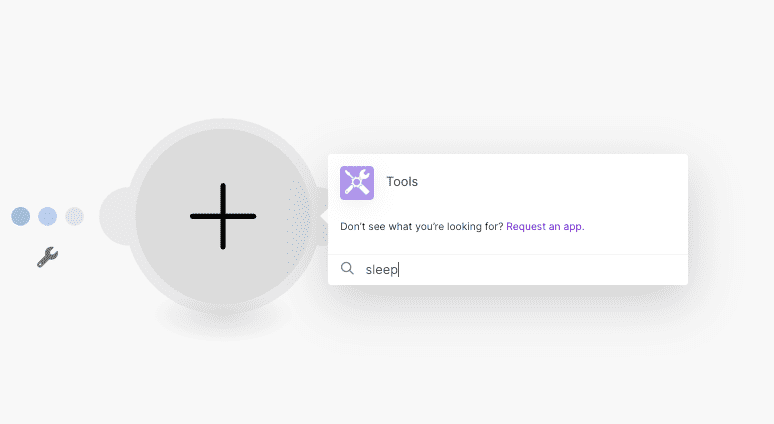
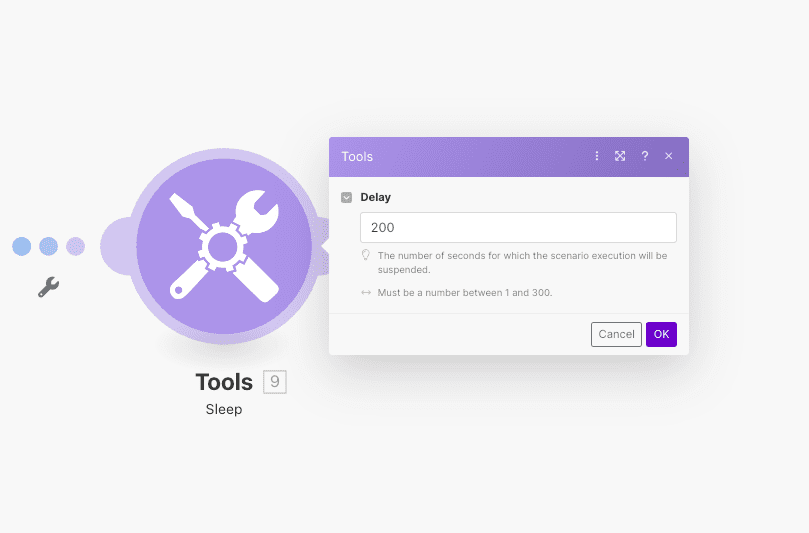
19. Add a SLEEP Module
Add a SLEEP Module to wait for the TTS to generate.
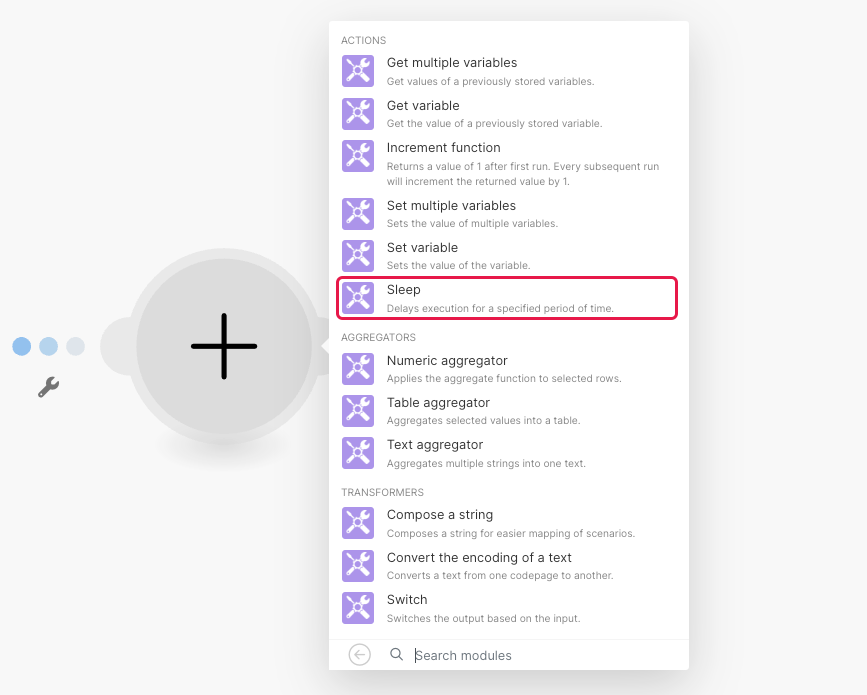
20. Set the SLEEP
Set the SLEEP Duration between 1-5 minutes (60-300 seconds).
Let’s make it 200 seconds for our demo.
Now let’s upload the generated Mp3 file to Dropbox, to do that we need to download the Mp3 file in this scenario first.
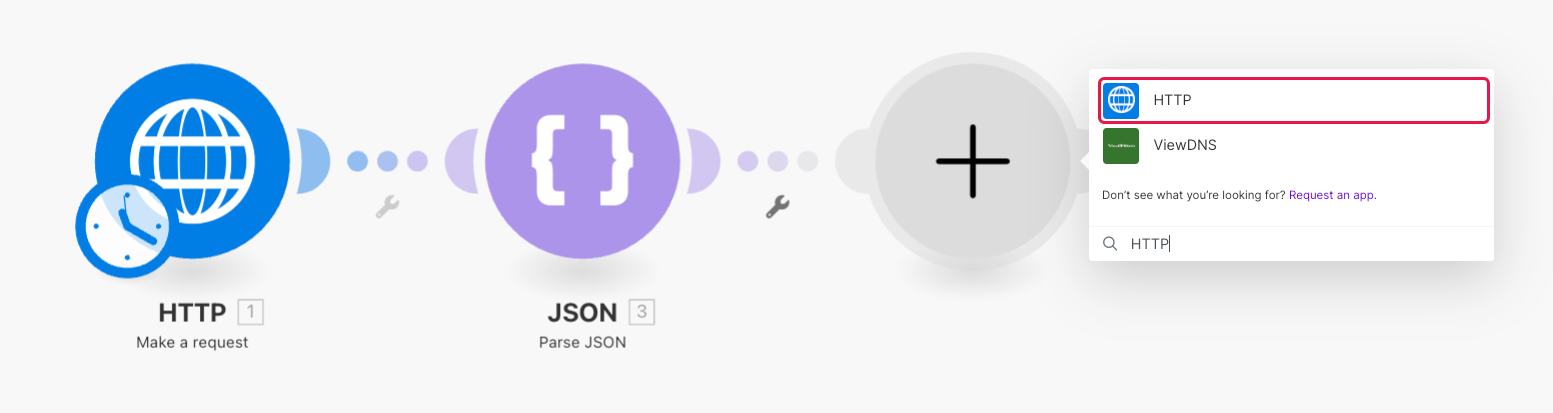
21. Add another HTTP Module
Add another HTTP Module to Get the Generated TTS.
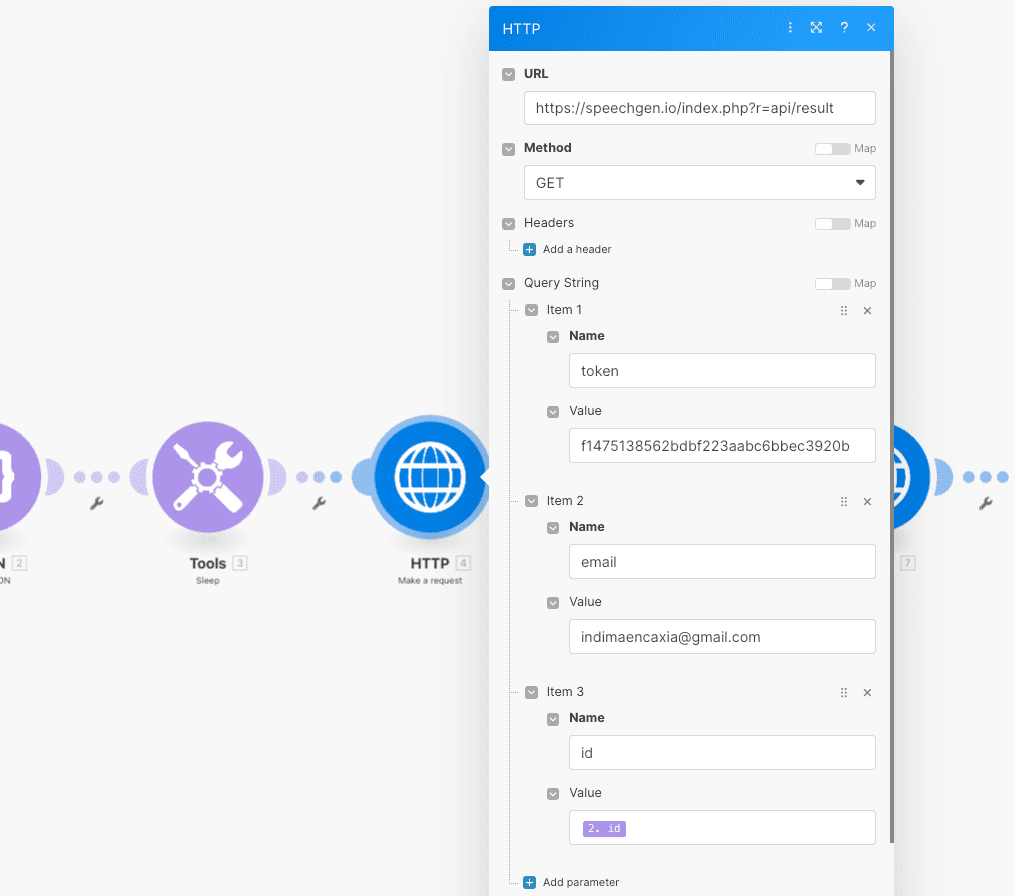
Insert the necessary Parameters:
- token = The API Token you copied from Step 2
- email = The email associated with your SpeechGen account from Step 2
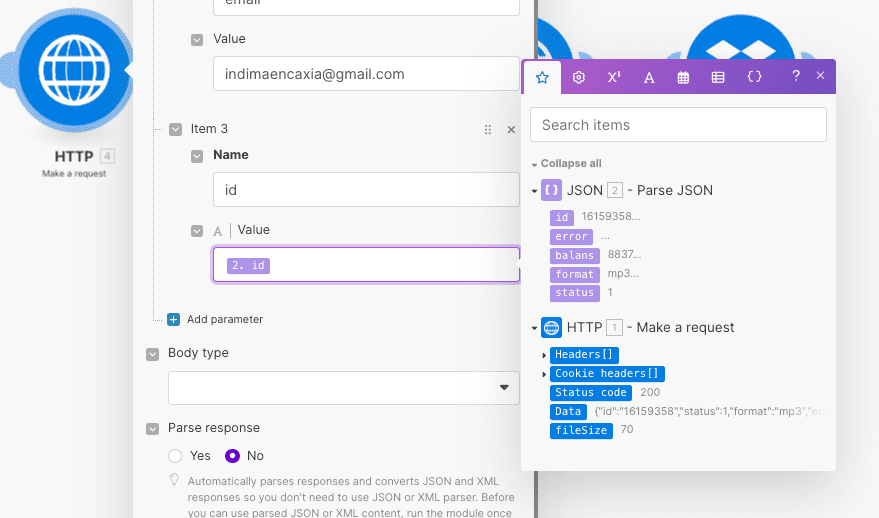
- id = The id of the TTS from the first request [Parse JSON, step 2]
22. Mapping the id from the JSON module
23. Get the data
Run the scenario to get the data and add another Parse JSON module
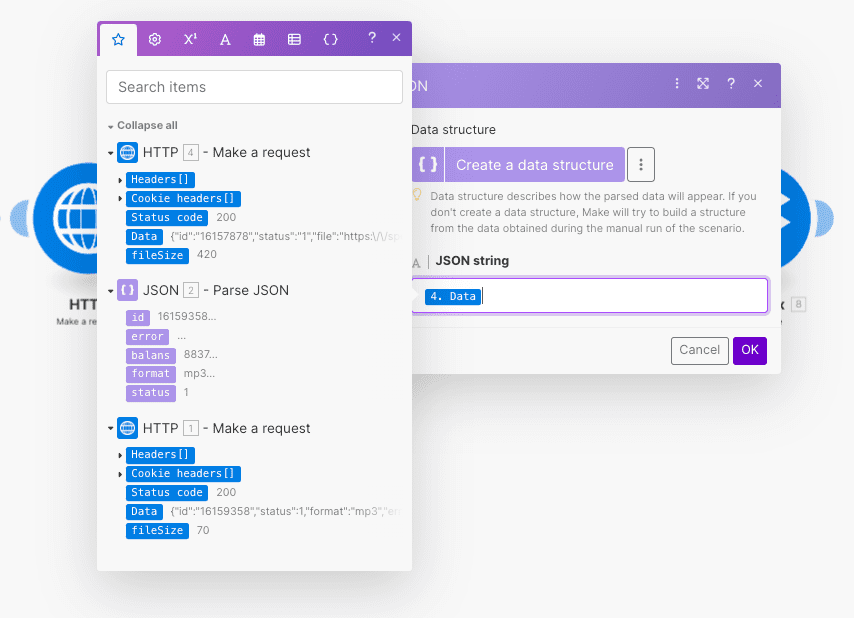
Map ‘Data’ from the previous HTTP module.
23. Run the scenario one more time
Run the scenario one more time to get data from the last Parse JSON Module, then Add another HTTP Module to download the file.
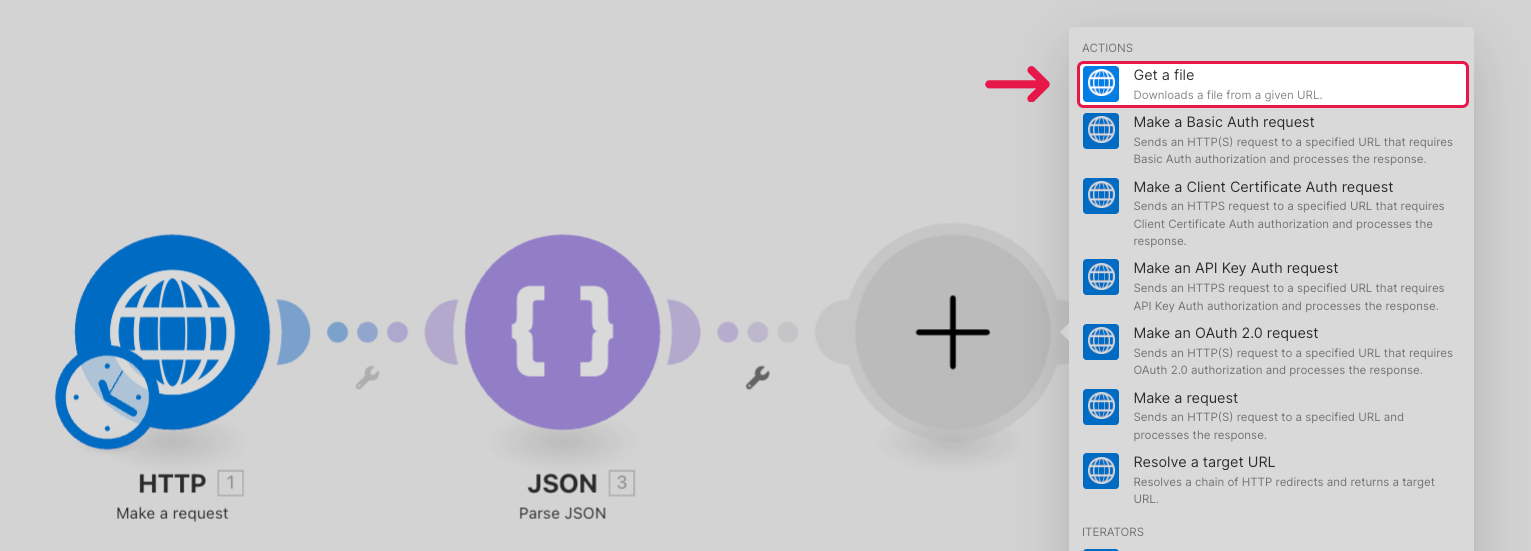
24. Select ‘Get File’
Select ‘Get File’ so we could download the Mp3 File inside the Scenario.
Most modules only require the URL, but DropBox requires Direct input of actual file data
25. Map the ‘file’ variable
Map the ‘file’ variable, which’s the URL we can use to get the file
26. Then we’ll add the DropBox module
27. Select Upload file
Choose The folder to save to inside your Dropbox, then Choose Map so we could change the name of the uploaded Mp3 File
Make sure you add the ‘.mp3’ file extension at the end of the name, so it’d easier for Dropbox to recognize it as an Mp3 file you can play.
After running the Scenario, we have the File uploaded to DropBox
Complete process for a 2-d method
- HTTP: Generate the Audio from text using SpeechGen.io
- JSON: Parse the data we get from the SpeechGen API
- SLEEP: Wait for a fews minutes until the TTS is ready
- HTTP: Request the mp3 file using it’s ID
- JSON: Parse the Data like we did before
- HTTP: Get binary data of the generated file
- Dropbox: Upload that data to Dropbox
Conclusion
Integrating SpeechGen.io with Make.com opens up vast possibilities for automating voice content creation. Automating speech synthesis can be useful for:
- Creating audio versions of articles or blogs.
- Generating voice notifications for customers.
- Producing educational and training materials in audio format.
- Enhancing customer service with voice responses.
Whether you're dealing with short notifications or lengthy educational materials, our guide will help you set up an efficient process with minimal effort. Transform your text into lively speech automatically, making your content more accessible and engaging for a wide audience.